Managing Documents Through the Thinmail Web SiteYou can
manage all your Thinmail documents by logging in at the Thinmail
Web site.
To log in, enter your email address and password and click on
the log in button, or click the SERVICES ICON. Your personal
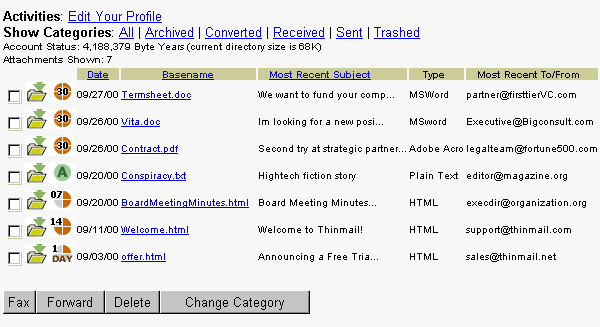
workspace opens, showing a list of all the Thinmail documents
you have archived. In front of each file name there are also a checkbox, a download button, and an icon indicating about how many days are left until the document expires. Clicking on the filename itself brings you to a detailed view from which you can perform many tasks on the individual file. 
|
| Fax Document |
|
| Forward Document |
|
| Remove Document |
(Note: The selected document(s) remains in your workspace for 24 hours with the category listed as Trash." After 24 hours the document(s) is removed permanently. |
| Set Category for Document |
|
Note: You can check multiple document boxes and perform the same function on all checked documents in a single operation. However, if you want to perform multiple functions, (e.g., fax a document, and then delete it, or fax one document and forward another) you must complete one function before performing the next.
Downloading documents
You can download any of your Thinmail workspace documents on your hard drive.
- Click on the folder icon in front of the document. A Save As dialog box opens. Navigate through your directories as you normally do to save the Thinfile to the desired location.
Managing Expiration Dates
In order to allow you to use Thinmail automatically, every file you send and receive has an automatic expiration date, which is set in your global preferences. An icon indicating 30+ days, or 14-30, 7-14, or 1-7 days until a document expires is associated with each document. If you do nothing, the indicated document automatically expires in the indicated number of days. However, you may change the expiration date any time before the document expires.
- Click on the icon indicating the number of days until expiration. An Edit Workspace Node opens showing you the document name, scheduled expiration date, and other information about the file.
- In the Expiration Date box, type in the date or date expressions on which you want the document to expire or check the Never Expires box, which places the file in the "archive" category.
- Confirm the new expiration date by clicking on the Update button at the bottom of the window.
You can also manage expirations by email, by forwarding links to "keep@thinmail.com" with a date expression as the subject. Our date grammar is pretty extensive, so besides actual dates, many expressions work:
sunday week 22 2001
22nd sunday
sunday 22nd week 2001
next friday
next month
in 3 weeks
90 days
3 weeks later
3 months later
Friday in 2 weeks
in 2 weeks on friday
last day of October
Friday (Friday of current week)
12th (day of current month)
Managing Your Profile and Preferences
At the top of your workspace, there is an Edit Your Profile Link. When you click on this link, a new page appears offering you the options listed below.
Edit Your Profile Page Options
| This link… |
Opens a Window so that you can…
|
| Examine Your Account Balance | See how much money you have left in your account. Internally, money is stored in our nanopayment system, the Byteyear(r). The current rate is $2.50 for a million byteyears. This allows us to charge for flexible use of storage on a day by day basis, and to charge small amounts for faxing and phoning. You can buy millions of them for not much money with a credit card. |
| View Recent Transactions |
Review charges made against your Thinmail account.
|
| Change Your Password |
Change Your Password
|
| Global Settings |
Change your primary identity in the Thinmail system and control the default expiration time for documents sent or received in your Thinmail account.
|
|
(for individual addresses registered at Thinmail) |
View, manage, and add to your Thinmail identities. You can change your preferences in three categories in this window: Receive As, Send As, and Filtering. You manage the identity associated with each address you have registered at Thinmail separately. To change any of these options, click on the preference listed in the column to the right of the identity for which you want to make changes. If you have not previously set a particular preference, click on the [edit] link in the column. Receiving Preferences
Follow these same steps to change receiving preferences for each address in your Thinmail account. Sending Preferences
Follow these same steps to change sending preferences for each address in your Thinmail account. Filtering Preferences
Click the Done button to confirm the changes. |
| Add a New Identity |
Register an additional email address with Thinmail.
|
|
(for all addresses registered at Thinmail) |
|